As I promised, I want to talk a little more about the technology behind Deathfire today. I mentioned on numerous occasions that we are using Unity3D to build the game, but of course that is only a small part of the equation. In the end, the look and feel of the game comes down to the decisions that are being made along the way, and how an engine like Unity is being put to use.
There was a time not too long ago when using Unity would have raised eyebrows, but we’re fortunately past that stage in the industry and—with the exception of some hardliners perhaps—most everyone will agree these days that it is indeed possible to produce high end games with it.
For those of you unfamiliar with Unity3D, let just say that it is a software package that contains the core technologies required to make a game that is up to par with today’s end user expectations. Everything from input, rendering, physics, audio, data storage, networking and multi-platform support are part of this package, therefore making it possible for people like us to focus on making the game instead of developing all these technologies from scratch. Because Unity is a jack of all trades it may not be as good in certain areas as a specialized engine, but at the same time, it does not force us into templates the way such specialized engines do.
In addition, the combination of Unity’s extensibility and the community behind it, is simply unparalleled. Let me give you an example.
The character generation part of a role-playing game is by its very nature a user interface-heavy affair. While Unity has solid support for the most common user interface (UI) tasks, that particular area is still probably one of its weakest features. When I started working on Deathfire, I used Unity’s native UI implementation, but very quickly I hit the limits of its capabilities, as it did not support different blend modes for UI sprites and buttons, or the creation of a texture atlas, among other things. I needed something different. My friend Ralph Barbagallo pointed me towards NGUI, a plugin for Unity that is specialized in the creation and handling of complex user interfaces. And his recommendation turned out to be pure gold, because ever since installing NGUI and working with it, it has become an incredibly powerful tool in my scripting arsenal for Deathfire, allowing me to create complex and dynamic interactive elements throughout the game, without having to spend days or weeks laying the groundwork for them.
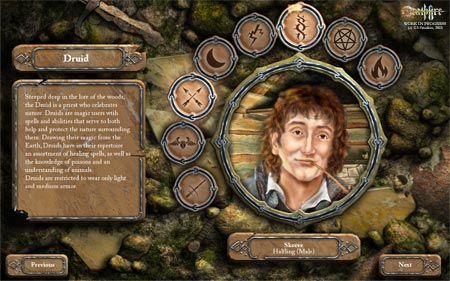
While you can’t see it in this static screenshot, our character generation is filled with little bits and animation, ranging from the buttons flying into the screen in the beginning, to their respective locations. When you however over the buttons, tooltips appear and the buttons themselves are slight enlarged, highlighted by a cool corona effect and when you select them, the button icon itself is inverted and highlighted, while a flaming fireball circles the button. While none of these things is revolutionary by itself, of course, it was NGUI’s rich feature set that allowed us to put it all together without major problems, saving us a lot of time, as we were able to rely on the tested NGUI framework to do the majority of the heavy lifting for us.
Interestingly, it turned out that some of NGUI’s features far exceed immediate UI applications and I find myself falling back onto NGUI functions throughout the game, in places where I had least expected it. It now serves me as a rich collection of all-purpose helper scripts.
When we began working on Deathfire’s character generation, one key question we had to answer for ourselves was whether we should make that part of the game 2D or 3D? With a user interface I instantly gravitate towards a 2D approach. For the most part they are only panels and buttons with text on them, right? Well, Marian asked me if we could, perhaps, use 3D elements instead. After a series of tests and comparisons we ultimately decided to go with a 3D approach for the character generation, as it would allow us to give the image more depth, especially as shadows travel across the uneven surface of the background, and offer us possibilities with lighting that a 2D approach would not give us. Once again, I was surprised by NGUI’s versatility, as it turned out that it works every bit as impressive with 3D objects as it did with the preliminary 2D bitmap sprites I had used for mock ups, without the need to rewrite even a single line of code.

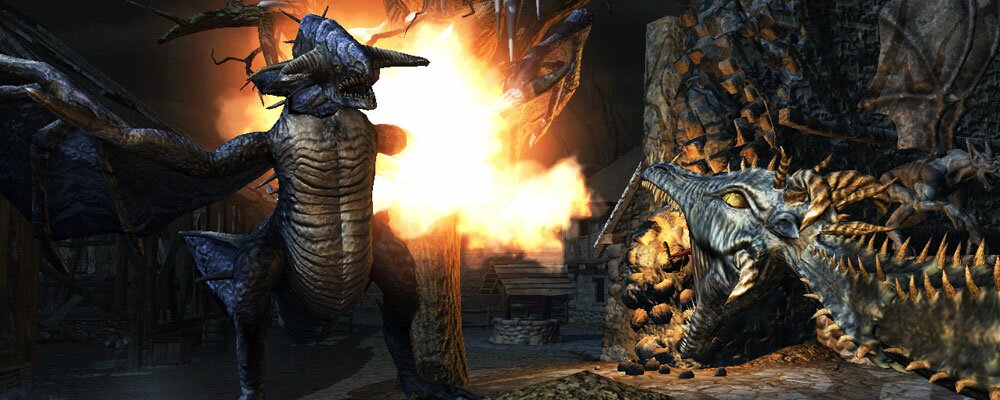
Another advantage that this 3D approach offers is the opportunity for special effects. While we haven’t fleshed out all of these effects in full detail yet, the ability to use custom shaders on any of these interface elements gives us the chance to create great-looking visual effects. These will hopefully help give the game a high-end look, as things such as blooming, blurs, particles and other effects come into play.
These effects, as well as many other things, including finely tuned animations, can now be created in a 3D application, such as Maya and 3ds Max, so that the workload for it can be leveraged across team members. It no longer falls upon the programmer to make the magic happen, the way it is inevitable in a 2D application. Instead, the artist can prepare and tweak these elements, which are then imported straight into Unity for use. It may not seem like a lot of work for a programmer to take a series of sprites and draw them in the screen in certain sequences, it still accumulates very quickly. In a small team environment like ours, distribution of work can make quite a difference, especially when you work with artists who are technically inclined and can do a lot of the setup work and tweaking in Unity themselves. We felt this first hand when Marian and André began tweaking the UI after I had implemented all the code, while I was working on a something entirely different.
This kind of collaboration requires some additional help, though, to make sure changes do not interfere with each other. To help us in that department a GIT revision control system was put in place, and it is supplemented by SceneSync, another cool Unity plugin I discovered. SceneSync allows people to work on the same scene while the software keeps track of who made which changes, so that they can be easily consolidated back into a single build.
Together, these tools make it safe for us work as a team, even though we are half a world apart. Keep in mind that Marian and André are located in Germany, while Lieu and I are working out of California. That’s some 8000 miles separating us.
While it may seem intimidating an prone to problems at first, this kind of spatial separation actually has a bunch of cool side benefits, too. Because we are in different time zones, nine hours apart, usually the last thing I do at night is putting a new build of the game in our GIT repository so that Marian and André can take a look at it. At that point in time, their work day is just beginning. They can mess with it to their hearts’ desire almost all day long, without getting in my way. When necessary, I also send out an email outlining problems and issues that may require their attention just before I call it a day. The good thing is that because of the significant time difference, they usually have the problems ironed out or objects reworked by the time I get back to work, so that the entire process feels nicely streamlined. So far we’ve never had a case where I felt like I had to wait for stuff, and it makes for incredibly smooth sailing.
But enough with the geek talk. I’ll sign off now and let you enjoy the info and images so that hopefully you get a better sense of where we’re headed. Next time we’ll take another dive into the actual game to see what’s happening there.

 Comments:

Leave a reply